Showing posts with label online class. Show all posts

Wednesday, 20 January 2016

Going around in Circles

I'm slowly continuing to work the lessons of the Novel Approach online class by Tammy Garcia in my large vintage ledger journal. As it's a class I won't mention much about how I made it. I love the class as all the lessons are there and you can work at your own pace, dipping into them randomly. If you're interested, join in!
 However it started life as a collage of text and magery.
And then got covered in paint apart from some selected areas. I used raw umber and two different blue paints.
I added the stick-on letters. The words Going around in Circles were also the title of the first quilt class I taught after my very first large quilt Water Rings won the Scottish Quilt Championships back in 1998. Circles have been an ongoing theme in my work ever since. The quilt doesn't get an outing often now that I no longer teach but it remains one of my own favourites even though, had I made it now, I would have added more quilting and beads. Here it is:


Saturday, 12 December 2015

Permission to Play Journal

I have finished my art journal made from cardboard following Carolyn Dube's online,and entirely free class Permission to Play. You may remember that I showed you some of the pages in an early stage here and I have since progressed with the class, adding a lot of stencilling, rubber stamping and the like. Then the journal was put together following Carolyn's instructions. I love how solid it feels and of course, being cardboard, the journal can stand up by itself perfectly.
 I'm showing you all the pages here, in the order they occur in the journal. All the stencils I've used are from Stencilgirl Products. This was also a good excuses to rummage in my large rubber stamp collection and bring out some of the ones I haven't used in a while.
Some of the stencils I used were also designed by Carolyn such as the text ones and the above right Venetian image.
I'm not saying these pages are finished. I might well add more in the future (such as a postage stamp or two!) but they are bound together and I'm going to leave them be for the time being.
 Above is what is possibly my favourite spread as the pages work so well together.


Thursday, 3 December 2015

Permission to Play

I have finally finished the large quilt that I started back in the spring. I have procrastinated about it, cursed it, almost abandoned it,and fought with it,  but through gritted teeth it has been done at last and I'm even reasonably happy with it. I'll be featuring it here once it goes off to it's first outing but no quilt has ever given me so much grief. Partly it was the circumstances this year such as losing our sweet greyhound girl as well as other losses and partly it was me, myself, who got in the way. Lots of other things have been achieved all in an effort to avoid working on that quilt. Once again I have sworn to make smaller art but sometimes it just needs to be big even if I don't want it to be.
A reward was in order for completing it and I made a start on the aptly named Permission to Play online class by Carolyn Dube.  This is an entirely free class and believe me, it's better than many classes I have paid for. The supplies too are very cheap: you just use what you already have. It will result in a journal and I promise to show you the finished article in due course.
Thus far I have only done the first lesson and as you can see the pages are all made out of cardboard. I took to pieces an Amazon box (of which quite a few are arriving at the moment!) and my pages are sized 9 x 6".
For the first layer I used gesso, paints and collage with vintage paper and as well as papers that were gelli plate printed and part of my large stash of such papers hanging around the studio. These are the 3 pages I liked best so far (there are 8 in total in my journal). I'll be starting work on the back of all of them later today.

Saturday, 7 November 2015

Gelli Plate Printing

I'm doing an online Monoprint Collage class with the artist Jane Davies and the first step was to create collage material on our gelli plate. I had lots of pages already but decided to do some more as it just so much fun to do. Here are some of the results.


Thursday, 12 February 2015

Making Dereliction


Is it still dereliction when you produce it yourself? I am in the process of making a fabric book in grunge style following the instructions of an online class by Donna Downey. It involves materials such as  poly filler and gesso, and then partly removing it to make it look like an ancient graffiti filled wall.Of course I will  blog more details of the book once it is done but for today this detail looks pretty derelict to me. Hope it counts for DerelictThursday which is a challenge on the blipfoto site every Thursday. 

Wednesday, 19 March 2014

More Graffiti

I'm still working away on the pages from the Graffiti of my Life online class by Dina Wakley. It involves having lots of fun with stencils, paints and spray inks. I'm also using vintage book pages as you can see.

In the meantime the broadband saga continues. It came back last evening, went off again shortly before midnight and then returned once again around 10 am this morning. Apparently multiple engineers are working on cards in the exchange, and I'm guessing these aren't craft cards!

Every time it returns I'm frantically trying to keep up with this blog, my daily Blip foto as well as my e-mails but I apologize in advance if I don't get back to anyone as fast as normally is the case. All I can do is soldier on with what we have (or not have!).

Saturday, 15 March 2014

Playing with Graffiti

I've been working away in spare moments on pages for my latest online class, run by Dina Wakley called Graffiti of My Life. I'll share more about it once the journal is done which might take some time as I'm rather behind with other things that are more urgent. But I must say I'm enjoying this one so much that I steal time to indulge!
I love that I can use all those things I've saved up such as vintage pages and music, my circular stencils, circular punches and the like, not to mention all those yummy spray paints. Great to just go mad with them and as you can see I also incorporated both hand and machine stitching. I can already feel that I will make more art journals in this way.

Friday, 7 March 2014

Affirmation Cards


As I mentioned in a previous post I have been following Kiala Givehand's book making videos on You Tube and have even made some of them. In fact I'm about to tackle another one shortly. All the YouTube videos and further instructions (to be found here) are entirely free which is very generous of her. I always feel such a gesture deserves some sort of thank you and the only thing I could think of was to join one (or two!) of her to be paid for online classes.
My first choice was her Artful Affirmations class which is ongoing at the moment. That means that not all the class is up just now. Kiala is adding more videos as we go along. So these cards are in the very first stage of development. The affirmations will be added at a later time on the other side of the cards.
I had SO much fun with just doing this. And as you can see it gave me the opportunity to search out all my rubber stamps and use those ones that spoke to me. In fact, I could make another set of cards to use all the other stamps that I loved but for which I had no cards left.

Now there is a thought I just gave myself. I might just do that while waiting for the next videos!

Saturday, 1 March 2014

Gelli Print Junk Journal

I have been attempting in the last few days or so to create some order out of the chaos of my studio (don't laugh!). It's not easy as all I seem to be doing is moving the mess from one place to another but in the process I'm making some lovely discoveries of goodie bags bought some time ago and mislaid under other things. I've also found some finished projects that were laid aside for future blip posts and then forgotten about. This is one such project completed at the end of December last year. It was done following the instructions in an online class by Samie Kira Harding, better known as the Journal Girl. It concentrated on gelli plate printing and I had a lot of fun doing that. I enjoyed the fact that we were then told how to put all those printed pages together in a journal which ended up having a very colourful mix of different sized pages.
 This is the front cover, using a leaf stemcil.
And here you can see part of the innovative binding technique. No instructions from me here. You will have to sign up for the class instead. But I love how this worked and can see myself using it for future journals.
I have already started to do some journalling on the pages and I usually keep those to myself. If I have to start censoring myself in what I write in my journal because other people are going to read it I lose the freedom that is essential for art journalling. But some pages have no writing yet but I have add some imagery (Venice, what a surprise!) as well as a little piece of the lace background left over from those ATCs I showed you a few days ago.
 And here is another spread I have started and you can also see that the pages in this journal vary in size.
It includes deli paper which in this case has a circle gellied (is that even a verb?) on to it. Because deli paper is very transparent you can see the pattern on the page below it through the paper.
And this is the last page spread with another view of that great binding.

Highly recommend this online class, called Gelli Print Junk Journal. It's lots of fun with very clear and easy to follow instructions and you end up with a lovely end product. What's not to like!

Thursday, 30 January 2014

Grunge and Graffiti Journal

The outside world hasn't much to offer photographically speaking so I have been reduced to picturing what is on my work desk. Mainly those are all the bits and pieces that will eventually become another art journal from an online class. I'll give you all the details when it is finished which won't be for some time yet.

My inner peace has gone walkabout at the moment as I have been waiting for a courier delivery for two days now! You have to wonder what the point of such companies is if they don't get the job done any faster than the Royal Mail, and this is from someone who used help run one. But of course such sloppiness never happened in my day (well, almost never!).


Wednesday, 9 October 2013

Gelli Plate Printing

I've recently done a gelli plate printing class online, run by Carla Sonheim, and have already blipped at least one sample of this class previously. But today I thought I would write a bit more about it here on this blog. What is a gelli plate, you may ask (although I know that some of you are quite familiar with it already). Well in the past people used gelatine to make a smooth surface from which to take monoprints. But the gelli (think of pudding) always was a bit fragile and easily damaged and also you had to make it before you could do anything, which took time, and after use it had to been thrown out and couldn't be preserved. So some smart cookie conceived the idea of making a commercial gelli plate which is for long term use and is ready for action whenever you want. Specially this last aspect made it very attractive to me as I like to follow up on my bright ideas as soon as they pop up in my head.
I've done several online gelli classes already. There are many free on YouTube, and Julie Fei-Fan Balzer ran a monthly one not long ago which you can still buy. I've also done lots of experimentation on my own. But there is always more to learn and so I signed up for the gelli plate printing class by Carla Sonheim. Like her I did my first batch on watercolour paper and you can see some of the results here.
Sometimes I'm showing you the entire watercolour sheet and other pictures show just a detail of one of the papers that I particularly liked. Of course fabric is never far from my mind and I'm always looking at my painted papers with the eye of a textile artist and considering how to get it onto fabric. One of the easiest ways is to either photograph the paper or scan it, transfer it to the computer and print it out onto fabric sheets using my own inkjet printer. And that works very well.
However for the best results I upload my pictures to Spoonflower and let them print it out. Yes, it's not exactly cheap (specially as they are located in the US) but the results are superb. I've used them for quite some time and have never been disappointed. In fact I'm sometimes amazed by how impressive the resulting fabrics look. There are also more and more places here in the UK who aim to provide the same sort of service such as Design Matters run by Laura and Linda Kemshall. I haven't used them yet but watch this space!
But of course there is also another alternative and that is to use your gelli plate to print directly onto fabric. I was recently asked what paint I use and I use a mixture of acrylics and fabric paint. I'm not really bothered about wash-ability as my quilts are all meant to go on the wall so that isn't an issue for me. I'm also not disturbed that ordinary acrylics change the handle of the fabric somewhat. Again this might be an issue if you're going to use the item but not for wall hangings. If you want to wash your pieces you really should use dedicated fabric paints only and make sure to heat set them properly. As for me I concentrate on the colour of my paints and I mix all the different paints to my heart's content. What you see just above and below are all prints made using the gelli plate on cotton, with sequin waste in different sizes as a stencil.
I've printed these sheets, all around the A4 size, this morning and have now left them to dry. I might add more to each of them but it's always a good idea to let them dry and come back to them in a few days time with a fresh eye to see if they need any further work. In the meantime I've photographed my favourite bits so that I can reprint them at this exact stage.
I also try to keep in mind that these fabrics are not meant to be finished pieces like the paper sheets but are instead intended to be used in my quilts so that they will cut up into the required sizes. Therefore there is no need to be over fussy about each individual sheet. I can select the exact bits I want when I need them.

Finally I've had a question about the colours I used on the fabrics. I only used 5 different tubes of paint, one turquoise, one magenta and one lemon yellow, all to be mixed with white or black. If you stick to a limited colour palette the chances of getting good results are much higher. In fabric painting as well as dying less truly is more. It's all too easy to end up with mucky brown or slushy grey although of course you might like that. I don't!

Wednesday, 18 September 2013

Mixed Media Mayhem Journal

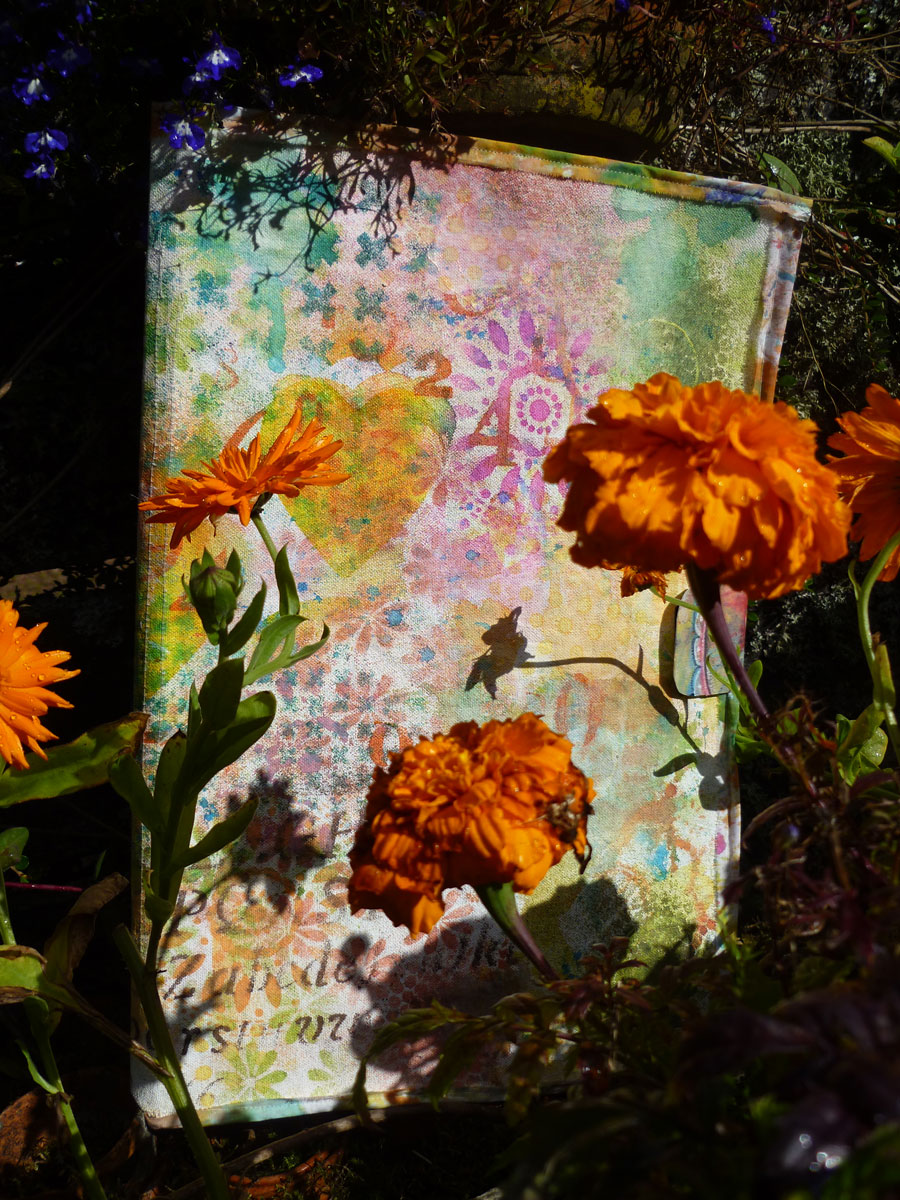
Last night was a very cold one with a touch of ground frost already and it reminded me that it's about time to remove the paints and inks from my painting shed so that they don't suffer frost damage. Last year I was a bit late doing this and as a result lost an entire large pot of gesso that turned solid after freezing and never returned to a liquid state. I'm trying to finish all the projects from my online classes before it turns cold properly and so today I can show you the end product of the Mixed Media Mayhem online class taught by Roben Marie Smith. She is a very enthousiastic and excellent teacher with beautifully made videos. Really you can't go wrong in her class and I just love all those different journals that are the result.
This one has canvas as the cover and the inside journal pages started life as file folders. They got treated with gesso, inks and acrylics and lots of stencils. I'm getting stencil obsessed! The inside pages aren't finished yet as they are only the beginning. There will be lots more to do when art journalling on them which I hope to do this coming winter. That will be up to me. I also painted both sides of the cover, both inside and out, just so I could make a choice which one I like best.
The other item I added was the closure which is from another of Roben Marie's classes that I will share with you in the near future. This journal in the class has no closure but I wanted one.
This is the back of the journal and you can see that the canvas cover has been edged with fabric. This is in fact cotton that I used to wipe up the inks etc. while working on the cover and the pages.
This is a detail from one of the inside pages. I used it as my blip a few days ago.
As you can see after that cold night we are having a lovely sunny day so that I could take some pictures outside. The journal toned in beautifully with the marigolds!

LinkWithin

Related Posts with Thumbnails