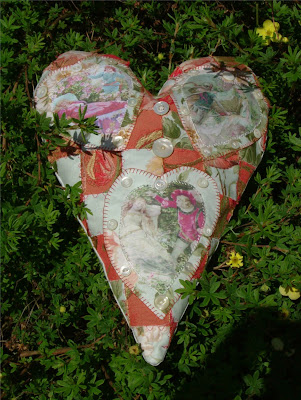
 This project has been quite some time in the making as I was hoping to purchase some rose scented filling for it but I haven't managed to find that yet, although there is a lavender smelling sachet inside instead for the time being.
Here are the instructions for the finished cushion, which is pictured above in a potentilla bush as helas, it's too early for my roses to flower!
 To start with make a heart template by taking an A3 sized sheet and folding it in half vertically. Draw half a heart shape on the folded edge and cut out, so that you have a totally symmetrical heart.
  Make the background by weaving two different rose fabrics together. Cut 1.1/2" wide strips from one of the fabric vertically and 1.1/2" wide strips from the other fabric horizontally. Put a stabilizer which is adhesive on one side (I used Vilene) down on a sturdy surface with the adhesive side facing up and pin down the vertical strips at the top. Start weaving the horizontal strips through this, up and under and alternating in each row (see illustrations above). Make sure the rows abut each other closely. When you're happy iron the strips onto the Vilene. Once they are adhered, turn the weaving over and iron again from the Vilene side to make sure the whole thing is stable.
Take it to your sewing machine and stitch over the bordering rows with a decorative stitch both vertically and horizontally. I used a flowing line and red thread. Using your template cut out the heart shape from this background, adding 1/2" seam allowance at the same time.

Now it's time to add your pictures to the cushion. All my images are from Alphastamps ( Grimm Covers #2 and Sleeping Beauty #1). They are cut to 3 small heart shapes with a loose hand and layered up with one of the rose fabrics I used for the background. They were machine stitched on with a zigzag stitch around the Alphastamps image and the rose fabric was then buttonholed stitched by hand onto the background. Vintage buttons were then added, also by hand. They were also stitched in between the images.
To finish the cushion, cut a piece of backing fabric the same size as your cushion front, put the front and back right sides together and sew along the outside of the heart shape. Make sure you leave approx. 5" open along one side to turn the cushion out. Cut the seam allowance from the pointed bottom of the heart and cut into the seam allowance at the V shape at the top to enable the seam allowances to lay flat and then turn the cushion the right side out.
Add stuffing (I used Wonderfil) and make sure the cushion becomes nicely rounded. At this time you can also add any smelly sachets to make a wonderful fragrant cushion. Slip stitch the opening closed.

2 comments:
WOW!!! This is stunning. I love everything about it, the colors are incredible.
Debby
WoW!! I finally get back here to comment on this beautiful cushion. The woven fabric is so wonderful. Thank you for the instructions as I am going to try this, Frieda. I have never done this before-I am always learning from you; I so appreciate your willingness to share.
This is just beautiful!
Post a Comment