Showing posts with label vintage images. Show all posts

Friday, 16 August 2019

Stencilgirl® August 2019 Project

My project for Stencilgirl® this month was inspired by a poem by Ben Okri. I printed it out quite some time ago and it has been living on my work desk every since, with me re-reading it occasionally. The words touched me deeply. Then a few weeks ago I saw it again this time accompanying a photograph on Blipfoto. I made me think I wanted to do something to make it into a permanent reminder to myself and this is my first attempt to do so, starting with the first two lines.

I, like most of you I suspect, am always on the lookout for the “perfect” sketchbook and during the search have acquired so many that I very much doubt I will be able to fill them in my lifetime but that doesn’t seem to stop me buying more. And I think I have now discovered one that is as close to perfect as it’s going to get. They are the journals by www.artbymarlene.nl  for StudioLight. The one I’m using here is the big version at 8 x 11.3/4” and it has the most wonderful thick paper. It is also ring bound so you can take the pages out to work on them separately.  My plan is to fill this journal with my illustrations of Ben Okri’s words. 

This page has the first few lines: “As clouds pass above our heads, so time passes through our lives. It also features a vintage German Christmas card.  You will be getting more lines as part of future projects. You can find the full step by step tutorial for this page on the Stencilgirl® Talk website. 


Tuesday, 14 August 2018

Art Cards 216 - 224

Here is the next set of 9 art cards. Remember these cards are part of the #365somethings2018 project on Instagram, where I hope to end up with 365 cards, one for each day of 2018. If you want to see them appear individually each day you can find them all on my Instagram feed.
Some of the cards in this set of nine were made as part of a monthly project as Guest Designer for Stencilgirl  Products® and that means you can find a full tutorial on how I made them on the Stencilgirl®Talk website.

Tuesday, 5 June 2018

The Stencilfied Journal Prompt 1

I have been working away on a secret project and the first part of it can now be revealed. This is an initiative by Tina Walker, called #thestencilfiedjournal. The idea is to use a journal (choice is up to you) and work away on the weekly prompts she will reveal on Mondays for the next 16 weeks (taking us to the middle of September). I was going to work in a Field Note journal (like Tina herself) but in the end decided I wanted to use a bound journal and went for the 9 x 14 cm 1951 Back to Basics journal by Clairefontaine. They are wonderfully sturdy and the journal should be capable of everything Tina wants us to throw at it.
Above is our first prompt (as provided by Tina) and I started with a 2 page spread right in the centre of the journal meaning I can go any way I want. For extra sturdiness I also glued two pages together and gessoed heavily before I began work.
The quotation I used is by Andy Warhol and was collaged from the Flow calendar last year. For the rest I simply went circle mad. The only requirement Tina set us was to use Stencilgirl® stencils exclusively in this journal. The reason being that this is part of a project she is doing for Stencilgirl®Products.  All will be revealed as far as that is concerned later this year.
I used the following stencils for this spread: L380 Circles Layer Me and M080 Repetition.

Working in this small journal reminded me why I love changing sizes. It somehow provides new inspiration to work on a smaller scale than I usually do. You can of course follow along too and you have till next Monday before the next prompt will be revealed. If you are on Instagram you can see all submissions by following the hashtags #stencilgirl and #thestencilfiedjournal.

Thursday, 3 May 2018

Collaged Art Cards

The days and months seem to whiz passed at an alarming speed at the moment. It feels like only yesterday since I showed you my Stencilgirl® Project for April and here I am back with another one in May.

You may remember that back in April I used my stencils to make the backgrounds on 3 x 3" cards for the #365somethings2018 project. This month I'm making the stencils the star of the show on each card. This was made possible by a gorgeous stencil set designed by Seth Apter, with stencils that are just the right size for these 3 x 3" cards.
You can read all about how I made these cards and find a list of all the stencils on the Stencilgirl®Talk website today. All the materials I used can also be found there.
I thoroughly enjoyed making this set of 9 cards (and some more too while I was at it!) and the individual cards will be fed into the #365somethings2018 project on my Instagram feed one at a time. At that stage I will add their date and number. We have already reached the point where a third of the cards for the year are done.

I am so grateful to Stencilgirl® for giving me the opportunity on a monthly basis to share my work to a wider audience.  The versatility of their stencils is amazing and I specially love being a member of the Stencilgirl®Club where you receive an exclusive set of stencils each and every month together with videos and PDFs showing how the artists that designed the stencils use them. Highly recommend you give it a go. 

Monday, 16 April 2018

It has a Song

The Joggles Art Journal Adventures prompt last week was to incorporate a bird. As you can see I added quite a few! I knew from the start which birds would make it as focal points. Several years ago now, I bought someone else's scrap journal in a second hand book shop. In a book about Belgian art this unknown person had glued in images from all kinds of (unknown to me) sources. Fortunately after many years the glue had deteriorated enough for me to be able to gently remove the images. I loved these birds immediately (sadly artist again unknown to me) and this proved the perfect opportunity to use them.
The background was collaged first using a variety of vintage pages, maps, wrapping paper and music sheets. The next step was made by adding water soluble oil crayons as well as paint and then removing them using stencil L565 Loopy Leafy Vines Background by Stencilgirl® Then I added the leaves etc. from a piece of scrapbook paper coming from a Somerset Studio magazine. The big birds were glued on and outlined. Hopefully with the much better archival glues we have nowadays they will stay put this time.
More little birds were needed to fill the background and they came from the large stencil from the May 2014 Stencilgirl®Club while the circular leaves pattern originated on the large stencil from the June 2014 Club stencil set. 
The quotation I used was printed using the computer. It's by Maya Angelou and reads: "A bird doesn't sing because it has an answer, it sings because it has a song". 

Friday, 13 April 2018

Four Seasons Joggles Journal


It was a great pleasure to be asked by Joggles to do a project for them to promote their gorgeous Joggles disc bound watercolour journals and art parts in conjunction with Marabu art sprays and art crayons. What fun! Specially as I love all these products. I love that the sprays are permanent, and the richness of the colours is simply stunning. And at the moment most of these materials are on sale! What could be better.

Joggles send me a kit containing 6 Marabu Art Crayons, 3 Marabu Art Sprays, one Joggles 6” x 9” Disc Bound Journal, and one Joggles Watercolor Art Parts – Bare Tree. I already had some art crayons and sprays by Marabu and used those too. Joggles stencils were also a perfect addition to the mix. You can find a full list of all the materials that I used at the end of this post.

Here are the finished pages of my journal. The inspiration came from the song Turn, Turn, Turn by The Byrds. A very catchy tune!

Spring

Summer
Autumn
Winter
Here are the instruction for my project: a journal about the Four Seasons.

The first thing I did when the kit arrived, was watch a Joggles video about how to put the watercolor disc bound journal together. It proved to be oh so simple and at the same time so ingenious! Then I took it apart again (although I left 2 pages in the journal that I wasn't going to use and these made putting the journal together at the end a whole lot easier)

Also notice before we start I always make sure that each layer that I'm adding is completely dry before I add the next one. With spray paints I prefer not to use a heat gun as that can make the spray move so I simply leave the pages to dry naturally.

Gesso one side of 10 of the pages, 5 with the indentations on the right and 5 with them on the left. Then set aside one of each for the moment. They will be your front and back cover in due course.
Summer
Glue on some of the vintage papers of your choice (see Materials list below) with a glue stick. I stayed with my theme and used dictionary pages about the seasons, music sheets as well as vintage flower books. I like to tear my collage papers rather than cut them. Don't cover the entire page but add them randomly. Make sure to extend the glued on papers over the indentations here and there (and when dry cut it out again). Add some washi tape with suitable seasonal imagery too. (see picture above).
Autumn
Use 3 colours of Marabu art crayons for each season and one of the Joggles stencils (see full list of materials at the end). Rub on colours with the crayons and remove some of the colour again through one of the stencils with a baby wipe. See above pic.

For Spring I used pink, sunshine yellow and kiwi crayons with Branches stencil
For Summer I used sunshine yellow, orange and pomegranate crayons with Woodcuts stencil.
For Autumn I used chilli, turquoise and plum with the Secret Garden stencil
For Winter I used black, apple green and aqua green with the Leaf Stalks stencil.
Spring

Moving on to the Marabu art sprays spray the following colours this time spraying directly through a stencil. (see pic above).

For Spring use Sky Blue and the Woodcuts stencil
For Summer use Cherry Red and the Secret Garden stencil
For Autumn use Tangerine and the Branches stencil
For Winter use Silver and the Woodcuts stencil.

Whenever I used art sprays during the making of the pages I made sure to mop up any remaining spray paint left on the stencils with the white ribbon (see Materials list below) and also with the 2 pages for the front and back set aside in the beginning.
Winter
Repeat the step above this time using:
Spring - Orange spray and the Secret Garden stencil
Summer - Apple Green spray and the Branches stencil
Autumn - Tangerine spray and Woodcuts stencil
Winter - Sky Blue and Secret Garden stencil (see above pic)
Spring

Add more texture by using Carabelle stamp SA50002 Circles and Dots, roll on the art crayon to the stamp, lightly spray with water and stamp on the pages. (see pic above)
For Spring - Gentian art crayon
For Summer - Apple Green crayon
For Autumn - Chilli crayon
For Winter - Gentian crayon.
Summer

Now for the focal images: the bare tree watercolor art part (see above pic).

Remove the bare tree art parts carefully from their background by cutting the connecting tabs with scissors. Retain the background as well as the art parts.

For Spring: spray sunshine yellow and apple art spray on a tree part.
For Summer use the background as a stencil and spray straight onto the page using apple green art spray
For Autumn spray tangerine, chilli and apple green spray on two tree parts
For Winter use the background as a stencil and spray directly onto the page using silver spray.

Don't forget to mop up your extra spray with the 2 pages that will become the front and back, as well as with the white ribbon.

Enhance the colour of the sprayed trees with art crayons in matching colours and once dry glue the trees onto the backgrounds (as per the finished pages shown at the top of this post) using matte gel. Once that is dry, outline the trees (both the art part ones or the stencilled ones) with a permanent black marker.


The pages that you set aside for the front and back and with which you have mopped up spare spray paint as well as wiped stencils should now look something like the picture above.

Spread titanium white paint over these pages with a brayer and then remove the paint with a baby wipe and through stencil Leaf Stalks. Let them dry. Outline the shapes with a permanent black marker.

In the meantime glue on images to the following pages using thinned down matte medium:
Spring - glue on flamingo from Stamperia sheet DFSA4273
Winter - glue on unicorn from Stamperia napkin DFT336.

Find suitable text or quotations you want to use on your pages and print them out using your computer. I printed on hand made paper and tore out the words rather than cut them.

Edge the pages with art crayons and smooth out the crayon along the edge:

Spring - Sunshine Yellow
Summer - Orange
Autumn - Chilli
Winter - Gentian
Front and Back covers - Kiwi.

Now layer the pages up in the order they will go in your journal ( making sure they are all the right way up too). Sew the front cover to the first page of spring (back sides together and lining up the indentations carefully), the second day of spring to the first page of summer (back sides together) etc. till you've joined the final 2 pages (second day of winter to back cover). Before sewing the first and last 2 sets of pages attach the now well coloured ribbon to the front and back covers with masking tape. It will be permanently attached with the sewing line.

Sew around 3 sides of the pages and leave the side with the indentations open. Use colours of thread in top and bobbin that match the pages. Use an old needle and sew slowly. Use a walking foot if you have one. If necessary use small clamps to hold the pages together and make sure they are lined up perfectly.

You can of course also use double sided tape for this step of putting the pages together. I just love the stitched line so tend to go for that option.

Now grab the disc bound watercolor journal with the 2 blank pages. Thread on the pages in the right order (you will find this much easier with those two blank pages already there. Once all the pages of your journal are in, remove the blank pages carefully.

Thread your ribbon ends through a bead and knot the ends.

Voila, your journal is done!

You can find a flip through of the journal on my Instagram feed as well as on YouTube
Front and Back Covers

List of  materials used:

Art Crayons in the following colours: Kiwi, Turquoise, Black, Plum, Sunshine Yellow, Pomegranate,Apple Green, Pink, Orange, Chilli, Gentian, Aqua Green
Art Sprays: Sunshine Yellow, Sky Blue, Tangerine, Orange, Silver, Apple, Cherry Red
Joggles stencils: Woodcuts 10-33772, Branches 30-33714, Leaf Stalks 10-33729, Secret Garden 20-33707
Stamperia Rice Papers as mentioned earlier
Vintage papers from a variety of sources, including a song book.
Washi tape
Approx. 1M of 0.5mm wide white ribbon
Sheet of thin hand made paper (to print your text on)
titanium white acrylic paint
matte medium
matte gel
Carabelle Stamp SA50002
permanent black marker

Finally please note that all links to products on the Joggles webside are affiliate links which means that I get a small commission if you buy the product in question. It does not in any way affect the prize you pay!

Tuesday, 27 March 2018

Calm

Our prompt last week on Joggles Art Journal Adventures was to use a word and also feature it's definition. As you can see I went with CALM in honour of my beloved Calm App, that provides daily 10 minute meditations as well as meditation specially geared towards a certain issue, such as anxiety, sleep, breathe and of course calm. It has beautiful music too.
To me an owl is the perfect embodiment of calmness. So he (or she) became the mainstay of my pages done in a 9 x 9" Bee Paper Mixed Media journal. I also wanted the spread to reflect calmness so stayed with a subtle, subdued colour scheme and only used one stencil to do the background. It's the large stencil from the March 2018 Stencilgirl Club. The only other addition was some paint splattering in white.
 I also found some very fitting postage stamps (all French) to tone in with the pages and showing calmness enhancing imagery.

Monday, 12 March 2018

Silent Sea

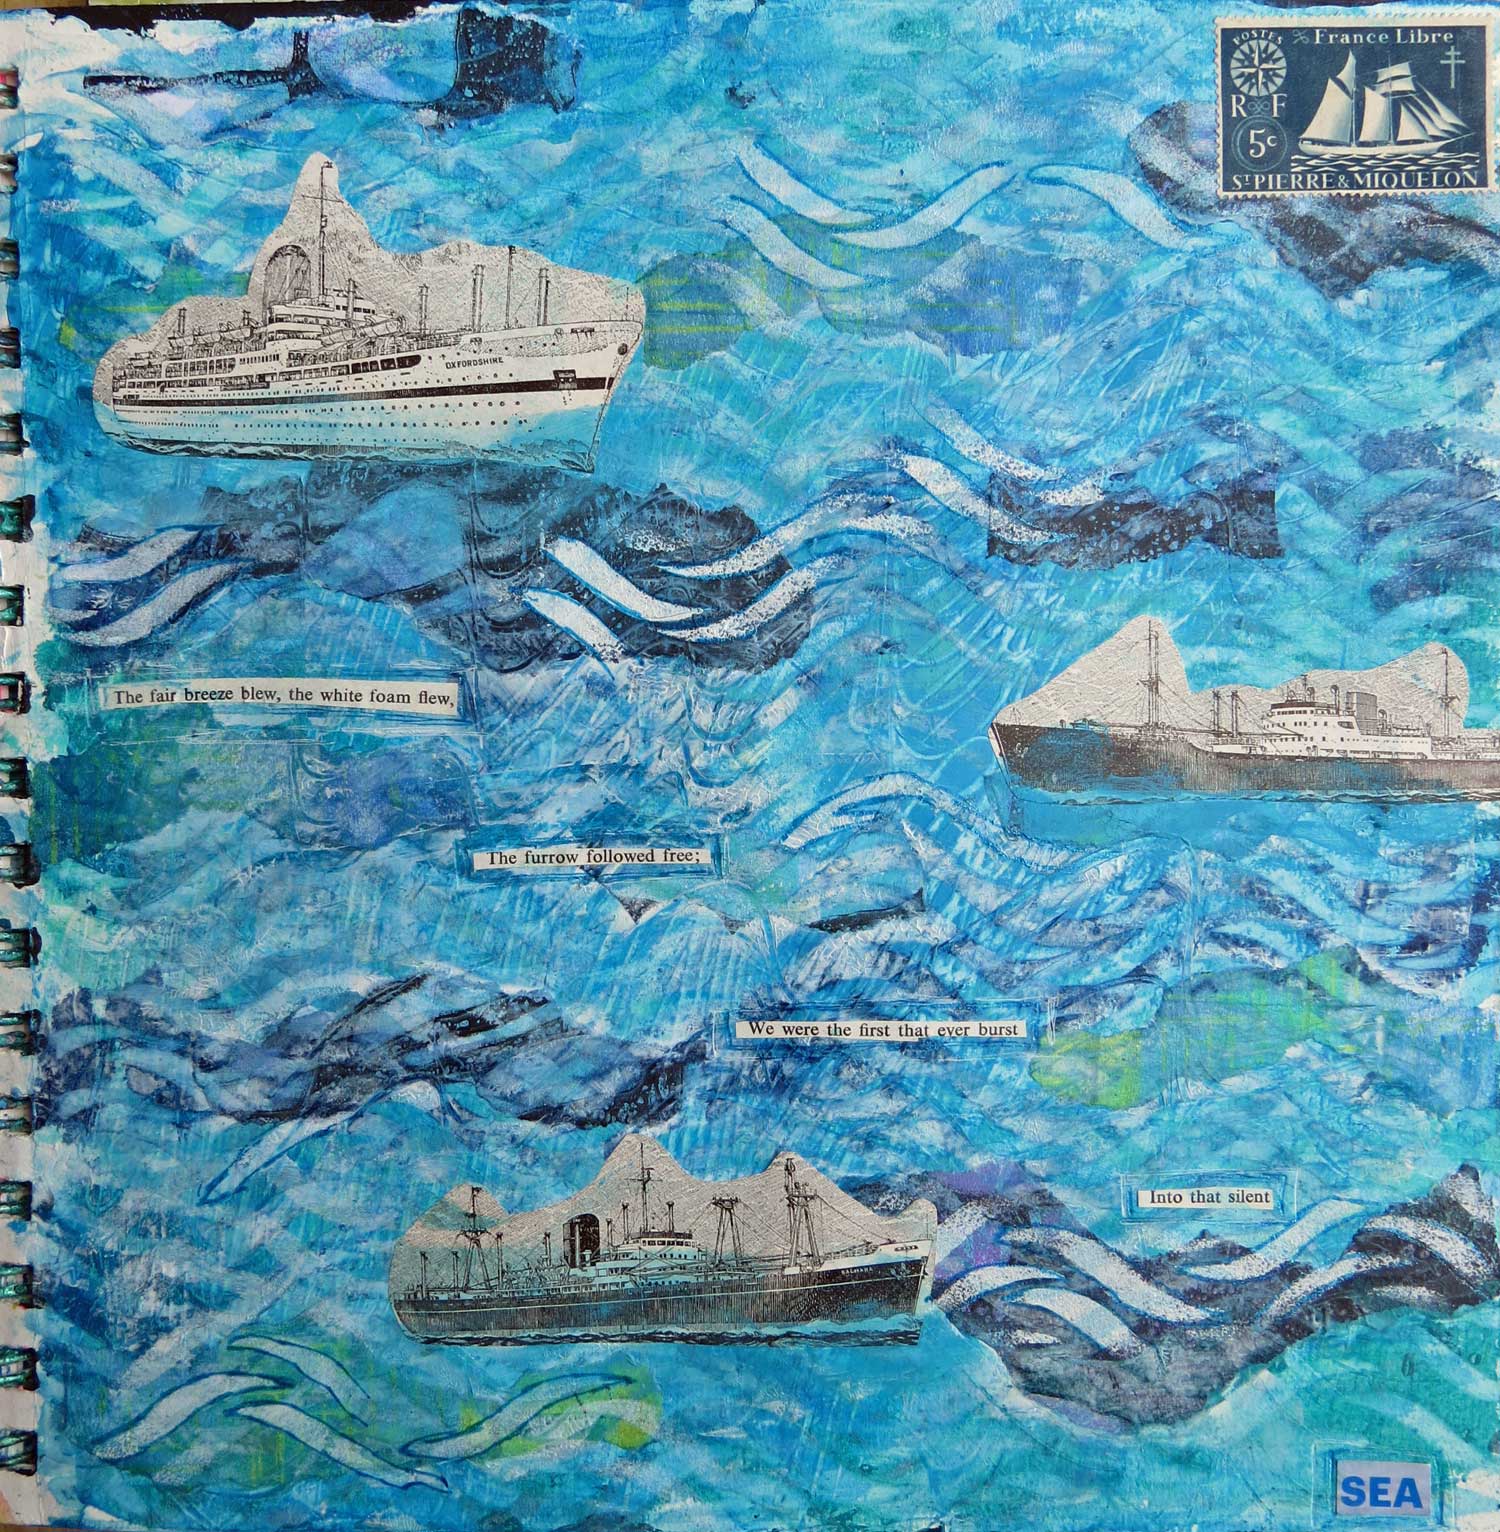
The letter S is what we were told to use on Joggles Art Journal Adventures this week and as you can see I went with the sea. I had a great quotation by Samuel Taylor Coleridge's The Ancient Mariner that reads: "The fair breeze blew, the white foam flew, the furrow followed free; we were the first that ever burst into that silent sea". 
The background was made entirely by using the S480 Symmetrical Waves stencil from Stencilgirl Products, and midway through I added more texture by tearing up strips from previously made gelli plate printed papers and glueing them on. I then added some more stencilling with the same stencil.
The ships came from a vintage book on seamanship and I also found a great postage stamp to add to the page, which is part of the 9 x 9" Bee Paper Mixed Media journal.
Mica spray paint was also added although it is hard to tell. In the background above you can also see the wave marks I made when I gessoed the page at the beginning.

Sunday, 4 February 2018

Those were the Days

The prompt on Joggles Art Journal Adventures this week was: to include song lyrics or title. I could have chosen from so many favourite songs but the choice was made for me before I started this spread in an A5 sized journal. I am in the process of destashing my "stuff" and have found many items that I had totally forgotten about. The vintage image I used in this spread was one of them. As soon as I saw her I knew she had to be my focal point this week and the song Those were the Days by Mary Hopkin seemed to suit her melancholic and sad look. I love this song from way back when and as I am growing older I understand it better and better.
The background was made using stencil L605 Soulful Scribbles Dots Dash stencil from Stencilgirl Products as well as L606 Soulful Scribbles Flourishes, both designed by Traci Bautista. I added stamping with an art foamie designed by Nathalie Kalbach
The text was added by the same rubber stamping method I mentioned in the post a few days ago using a mix of alphabet stamp sets and a piece of scrapbook paper.
I found text that to me related to the lyrics of the song on a rub on sheet from Tim Holtz and tried to rub it on, not perfectly but so that remnants of text can be seen. The vintage image was glued on and outlined with a black Stabilo All pencil.

Saturday, 13 January 2018

A is for ART


The prompt this week on Joggles Art Journal Adventures was to : use the letter A. In my book A always stands for ART so that's the road I took in my A5 sized journal. I knew I had a rubber stamp with the word ART on it (from the ARTspecially for you magazine) and began by making a fitting background for that. 
I used stencil S501 Letters on Box Stencil by Stencilgirl Products as well as S526 Shape Shifter and a variety of acrylic paints. When I was happy with the spread I added collage with vintage text from old English and French dictionaries, as well as tissue wrap with a French themed paper (from 7Gypsies). The final collage was the face that came from a painting featuring Margaret of Austria by Jean Hay, also known as The Master of Moulins dating to approx. 1490 (in the Metropolitan Museum of Art, NY).
Some mark making was added with a variety of markers as well as dripping acrylic paint (white and blue) down the pages. I also sprayed on some circles through sequin waste.

LinkWithin

Related Posts with Thumbnails