Showing posts with label Alice in Wonderland. Show all posts

Sunday, 20 June 2010

Tea in Somerset Studio Gallery


Until I see it with my own eyes I somehow seem to doubt that my work has actually appeared in publications. However my copy of the most recent issue of Somerset Studio Gallery (Summer 2010) is now in my hands and I can show you the picture of the I want my Tea fabric postcard as it appears in the magazine, page 180. You can order a copy by clicking on the button to the right of this blog which takes you straight to the Stampington website. They are the publishers of this and other delectable magazines.

I made it ages ago (July 2008!) as part of my commitment to Alpha Stamps and if you want to find out how it was made you can read all about it on a previous blogpost here.

Tuesday, 30 December 2008

Alphastamps Alice Swap

I'm trying to clear the decks for a fresh start in 2009 so that my New Years Resolutions List is less long!! And hopefully I might actually stick to a few!
So I decided to do as much of my To Do list before this year is over and the Alphastamps Alice ATC Swap was at the top of that list.
Hosted by my wonderful friend and magnificent hostess Lenna Andrews and sponsored by Alphastamps this was a must-do swap! It will be a 9 for 9 swap (and we will get one of our own back) but I made 10 as Lenna always spoils me SO MUCH. So one will be Lenna's to keep. I won't show them all to you as one is more or less the same as another one.
The background for them all consist of paper/fabric collages. I used 2 different ones as you can clearly see from the different colours.

I used stamps from the Alphastamps Alice Tea Party Clear Stamp Set, Alphastamps Mad Hatters #1 and Alice, the Trial collage sheets as well as the Alice Dresden scrap sheet and the Alice Paper Doll sheet, both also available from Alphastamps.


Additional items are charm teapots as well as round gold coloured brads.


Above is the #1 ATC which is the one I hope Lenna will send back to me. I really fell in love with this gorgeous rabbit which is on the Alice Paper Doll sheet.
And by the way, don't forget the daily give-away on the Alphastamps blog, your chance to win some of those delightful Alphastamps goodies.

Thursday, 28 August 2008

Alice Tea Party Quiltie


Still not finished with the Alice in Wonderland art as the collage sheets from Alphastamps are too tempting for words and I just can't stop thinking of new things to do with them.

This quiltie celebrates Alice's teaparty and you can see her hurrying towards it at the top right, led by the rabbit and at the side and bottom are images from the tea party itself.

The background for this quiltie (size 10" square) was formed by piecing 9 squares of patterned batik fabric together. I used 4" squares for the piecing and afterwards cut the quiltie to size. The pieced squares were layered with wadding (batting in US) and green backing fabric and machine quilted in the ditch. I then added the images as shown. They come from the Alphastamps sheets Alice Herself (for the large one at top right) and Mad Hatter's Tea Party #2. The text Curiouser etc. came from Alphastamps I wonder sheet. All images and text are from fabric sheets and are attached to the quiltie with a small zig-zag stitch, alternating between green and orange thread for the stitching. I then added beads, also alternating the colour and using size 11 seed beads, opaque green and clear orange. I also beaded sections of the background, using the patterns in the fabric as my guide. Hand seed stitching in orange and green was added around the text.

The edges of the quiltie were finished with zig-zag stitching and then with machine couched fancy yarns. In the four corners little green buttons were sewn on with orange thread.

Tuesday, 19 August 2008

I want my tea


This is another project with the Alice in Wonderland goodies from Alphastamps! It was made quite some time ago but what with my mother's visit this is the first opportunity for me to show it on my blog.

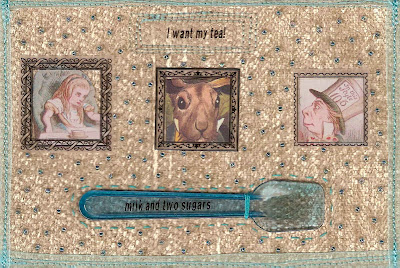
It's a fabric postcard, which was started with some velvet like fabric in cream which was layered up with Fast2Fuse (now also available from Alphastamps!). This was then machine quilted using one of the decorative stitches on my sewing machine. The paper images (all from the Mad Hatter's Teaparty #1 sheet from Alphastamps) were glued on and then surrounded by frames from the Alphastamps Inchies sticker sheet, which will be coming soon, in the meantime there is also a great inchies clear stamp set. The text I want my tea was made with my Dymo writer on transparent, self-adhesive tape, and I also surrounded it with decorative machine stitching in turquoise, picking up the colour from Alice's chair.

I added a gelato spoon (after adding the text with Dymo writer) by glueing and also a bit of stitching and outlined it with hand done running stitch, again in turquoise.

By hand, I also added sparkling turquoise size 11 seed beads all over the surface of the card.

I ironed a backing fabric to the other side of the Fast2Fuse and finished off the fabric card with a turquoise transparent ribbon (Threadart) around the edges.

A fun project which was sort of inspired by the words I want my tea, uttered by old-fashioned husbands as they returned home from work. I don't think there are many of these left and certainly the one who lives here, would not dare!!

Sunday, 10 August 2008

Red Queen Gothic Arch


I'm once again combining various threads into one arch! The theme for this week on the Gothic Arches Challenge site is Royalty Crowns and also today the new Alice in Wonderland goodies are revealed on the Alphastamps website. As a Design Team member I had the privilege of seeing these sheets before anyone else and they are truely delightful.

Playing with them is a real pleasure and this arch was no exception. My chosen royalty is the Red Queen, whose motto in the Alice in Wonderland book is: Off with her Head!

The background for this arch is watercolour paper onto which I have adhered a paper napkin based on playing card imagery. I used matte medium both underneath and on top of the napkin.

The Alice in Wonderland scrap (from Alphastamps) was glued on next, followed by the Red Queen pronouncing judgement, the Cheshire cat at the top( both from Alphastamps The Red Queen collage sheet) and finally Alice herself (from the Alphastamps Mad Hatter's Tea Party #1 sheet). She looks remarkably cheerful considering the verdict! There is however one head sort of rolling around next to her.
To unit all the different elements I applied watered down Titanium White fluid acrylic (from Golden) and also lightly sprayed the entire arch with Gold Glimmer Mist.

The card was sewn onto a felt and watercolour paper background with gold stitching and a gold edge was applied with a Krylon pen. The Cheshire cat was crowned to top the arch!

Saturday, 9 August 2008

Tea Pot Party

Time for another of my Alphastamps pieces. I had such fun making this one which became a lovely project to hand embroider outside while the sun was shining. Now sadly, a distant memory as when I look outside it really looks like it is November rather than August. Hopefully I will have caught the sunshine in my teapot!!

Start by making a template for your teapot. For this purpose, stamp the teapot from Alphastamps Alice Tea Party Clear Stamp set on paper, using Versafine, to get all the details as clearly as possible. Take this to your copy machine and copy it (follow the manufacturers’ instructions) till you end up with a size of teapot you like. Mine is 7.5" wide by 6" high.

Made 2 copies of this finished size teapot on paper. Pin one copy to red felt (all felt used is available from Alphastamps) and stitch around the outline as well as on all the lines dividing the different areas of the teapot. Use a colour of thread which you can see clearly. I used grey. Once you have traced all the lines by machine, tear away the paper.

Use the other template to cut out the various shapes on the teapot, trace these on different colours of felt, cut out the shapes and stitch them to the background teapot using matching threads.

Stamp the Rabbit and Alice, as well as the title: Tea Party (all from Alphastamps Tea Party Clear Stamp) onto muslin (calico if you live in the U.K.) and colour them in, using colouring pencils and colours of your choice. Cut the figures out leaving a small margin of muslin (calico) all around them. Applique them onto the teapot as shown, using a small buttonhole stitch.

Now it’s time for the handstitching. I used quite simple stitches such as buttonhole stitch, cross stitch, lazy daisies, running stitch, interlaced buttonhole stitch etc. If you’re not sure about your stitches I recommend getting a basic stitch book (my favourite is: Jan Eaton The Complete Stitch Encyclopedia)

Use threads which contrast with your background. You can use embroidery floss but my favourite is Colcoton (available in the U.K. here and in the US here). It’s originally from The Netherlands so I stock up when I’m there.
Add sequins and beads as shown or devise your own pattern.

When you have finished all your stitching, trace the reverse of your teapot template onto the paper side of Wonder-Under (Bondaweb in UK) and iron this onto the back of your teapot following the manufacturers’ instructions. Remove the paper backing. Add red felt and iron (with steam this time) to set. Once cool cut this backing felt to the size of your teapot.

Finally buttonhole stitch around the edges of your teapot in a thread of your choice.

Friday, 8 August 2008

Tea Party ATC

Very soon there will be an announcement on the Alphastamps site informing everyone of the delectable new goodies available there but as a member of the Alphastamps Design Team I'm in the lucky position to see these before everyone else. There are a lot of Alice in Wonderland related items coming up and I have been re-reading Alice to get into the right mood to create Alice pieces.

The first thing I made back in July is this ATC. The background is one of my paper-fabric collages that you will be familiar with by now if you're a regular reader of this blog.

I fuzzy cut the background to get the vintage rabbit image into my ATC, and layered it up with felt. I then stamped Alice on top (from Alphastamps Tea Party Clear Stamp Set) and added the other rabbit image (from Alphastamps Mad Hatter's Tea Party#1 collage sheet.) The Tea Party words were also from the Clear Stamp set.
The ATC was finished by mounting it on watercolour paper and zigzag stitching on my sewing machine around all the edges.

Quite simple really but sometimes that really does the trick!

LinkWithin

Related Posts with Thumbnails