Showing posts with label gelliplate. Show all posts
Monday, 3 March 2025
No 2/100
The 100 day project started in February but I am not participating in the usual way. Instead I have a pack of 100 A5 black cards and will use them to make art in a variety of ways. I’m making them when I feel like it so don’t expect one every day! This is No 2
Sunday, 23 February 2025
No 1/100
The 100 day project starts today but I am not participating in the usual way. Instead I have a pack of 100 A5 black cards and will use them to make art in a variety of ways. I’m making them when I feel like it so don’t expect one every day! This is No 1
Friday, 16 August 2019
Stencilgirl® August 2019 Project
My project for Stencilgirl® this month was inspired by a poem by Ben Okri. I
printed it out quite some time ago and it has been living on my work desk every
since, with me re-reading it occasionally. The words touched me deeply. Then a
few weeks ago I saw it again this time accompanying a photograph on Blipfoto. I made me think I wanted to do something to make it into
a permanent reminder to myself and this is my first attempt to do so, starting with the first two lines.
I, like most of you I suspect, am always on the lookout for
the “perfect” sketchbook and during the search have acquired so many that I
very much doubt I will be able to fill them in my lifetime but that doesn’t
seem to stop me buying more. And I think I have now discovered one that is as
close to perfect as it’s going to get. They are the journals by www.artbymarlene.nl for StudioLight. The one I’m using here is the
big version at 8 x 11.3/4” and it has the most wonderful thick paper. It is also ring bound so you can take the pages out to work on them separately. My plan is
to fill this journal with my illustrations of Ben Okri’s words.
This page has
the first few lines: “As clouds pass
above our heads, so time passes through our lives. It also features a vintage German Christmas card. You will be getting more
lines as part of future projects. You can find the full step by step tutorial for this page on the Stencilgirl® Talk website.
Saturday, 13 July 2019
Circuit Board Journal Quilts
Every year Grosvenor Shows organizes a Journal Quilt Competition where every participant is asked to contribute 2 A4 sized Journal Quilts. For 2020 the theme is Connections. That made me think about the different way humans now communicate with each other compared to times gone by. Mostly people met in person in the past, then came letters and finally the phone. Now we all have a wide variety of computerised devices to keep in touch. Whether you use a computer, laptop, tablet or phone they all use circuit boards to keep us connected! So they became my inspiration for the journal quilts. As I was using many stencils all by Stencilgirl® Products this also became my monthly July project as Guest Designer for them. That means you can find a step by step tutorial for this journal quilts on their Stencilgirl®Talk website.
![]() |
| Circuit Board Journal Quilt 1 |
![]() |
| Circuit Board Journal Quilt 2 |
![]() |
| Detail of beading and bugle beads |
Monday, 8 October 2018
The Stencilfied Journal Prompt Nineteen
Prompt 19 of #thestencilfiedjournal project told us to stencil a page and write one word over and over. As you can see I used the word memories
The background of the page was made using the stencils from the September 2018 Stencilgirl®Club and I collaged on some pieces of a vintage music sheet as well as a piece of deli paper that had been printed previously on a gelli plate using stencil S290 Deconstructed Zinnia
I also sprayed on some gold Perfect Pearls Mist Sunflower Sparkle which sadly you can barely discern on the pictures but gives a very satisfying (to me) effect on the pages. I added some rubber stamping with the text Destination Unknown to combine with the memory words, as well as the text on the music sheet.
It makes sense to me and tells a story but it's open to whatever way you want to interpret it! As is all art.
The background of the page was made using the stencils from the September 2018 Stencilgirl®Club and I collaged on some pieces of a vintage music sheet as well as a piece of deli paper that had been printed previously on a gelli plate using stencil S290 Deconstructed Zinnia
I also sprayed on some gold Perfect Pearls Mist Sunflower Sparkle which sadly you can barely discern on the pictures but gives a very satisfying (to me) effect on the pages. I added some rubber stamping with the text Destination Unknown to combine with the memory words, as well as the text on the music sheet.
It makes sense to me and tells a story but it's open to whatever way you want to interpret it! As is all art.
Thursday, 2 August 2018
Another Set of Art Cards
How many methods are there to put art on a 3 x 3" card? I have come to the conclusion that the answer is endless! They all look totally different depending on what order you do things such as stamping, collage, stencilling, gelli printing, and what stamps, stencils, papers and images you use. Every card looks completely unique, even if you use the same order and materials. So I make no excuses for sharing yet another method with you here and again these nine cards have been made as monthly project in my capacity of Guest Designer for Stencilgirl Products®.
Just a reminder that these cards will become part of my #365somethings2018 project on Instagram where I post a daily card each day this year. We are over the half way point with the cards (and the year!) and I still have lots more ideas!
Tuesday, 22 May 2018
It is Round
The letter R was our prompt for Joggles Art Journal Adventures this week. I found a quotation by Dada Bhagwan that reads: "This world has been changing from times immemorial. But because it is round one cannot find an end to it". It inspired me to work with as many circle stencils (from different sources) as I could find and many layers of colours, finishing off with black and white. I used quite a few of my Lindy's Magicals too. It started to look like the universe.
I then went to my stack of gelli plate printed pages and punched more circles from them. They were glued onto the pages as shown to represent planets and the sun.
I hand wrote the quotation using a white marker but it didn't show up too well on the page so I also added it in black on the big circles. There is a lovely bit of gold sparkle on the pages (in an A5 journal) but sadly this is very hard to spot on the pictures.
I then went to my stack of gelli plate printed pages and punched more circles from them. They were glued onto the pages as shown to represent planets and the sun.
I hand wrote the quotation using a white marker but it didn't show up too well on the page so I also added it in black on the big circles. There is a lovely bit of gold sparkle on the pages (in an A5 journal) but sadly this is very hard to spot on the pictures.
Monday, 12 March 2018
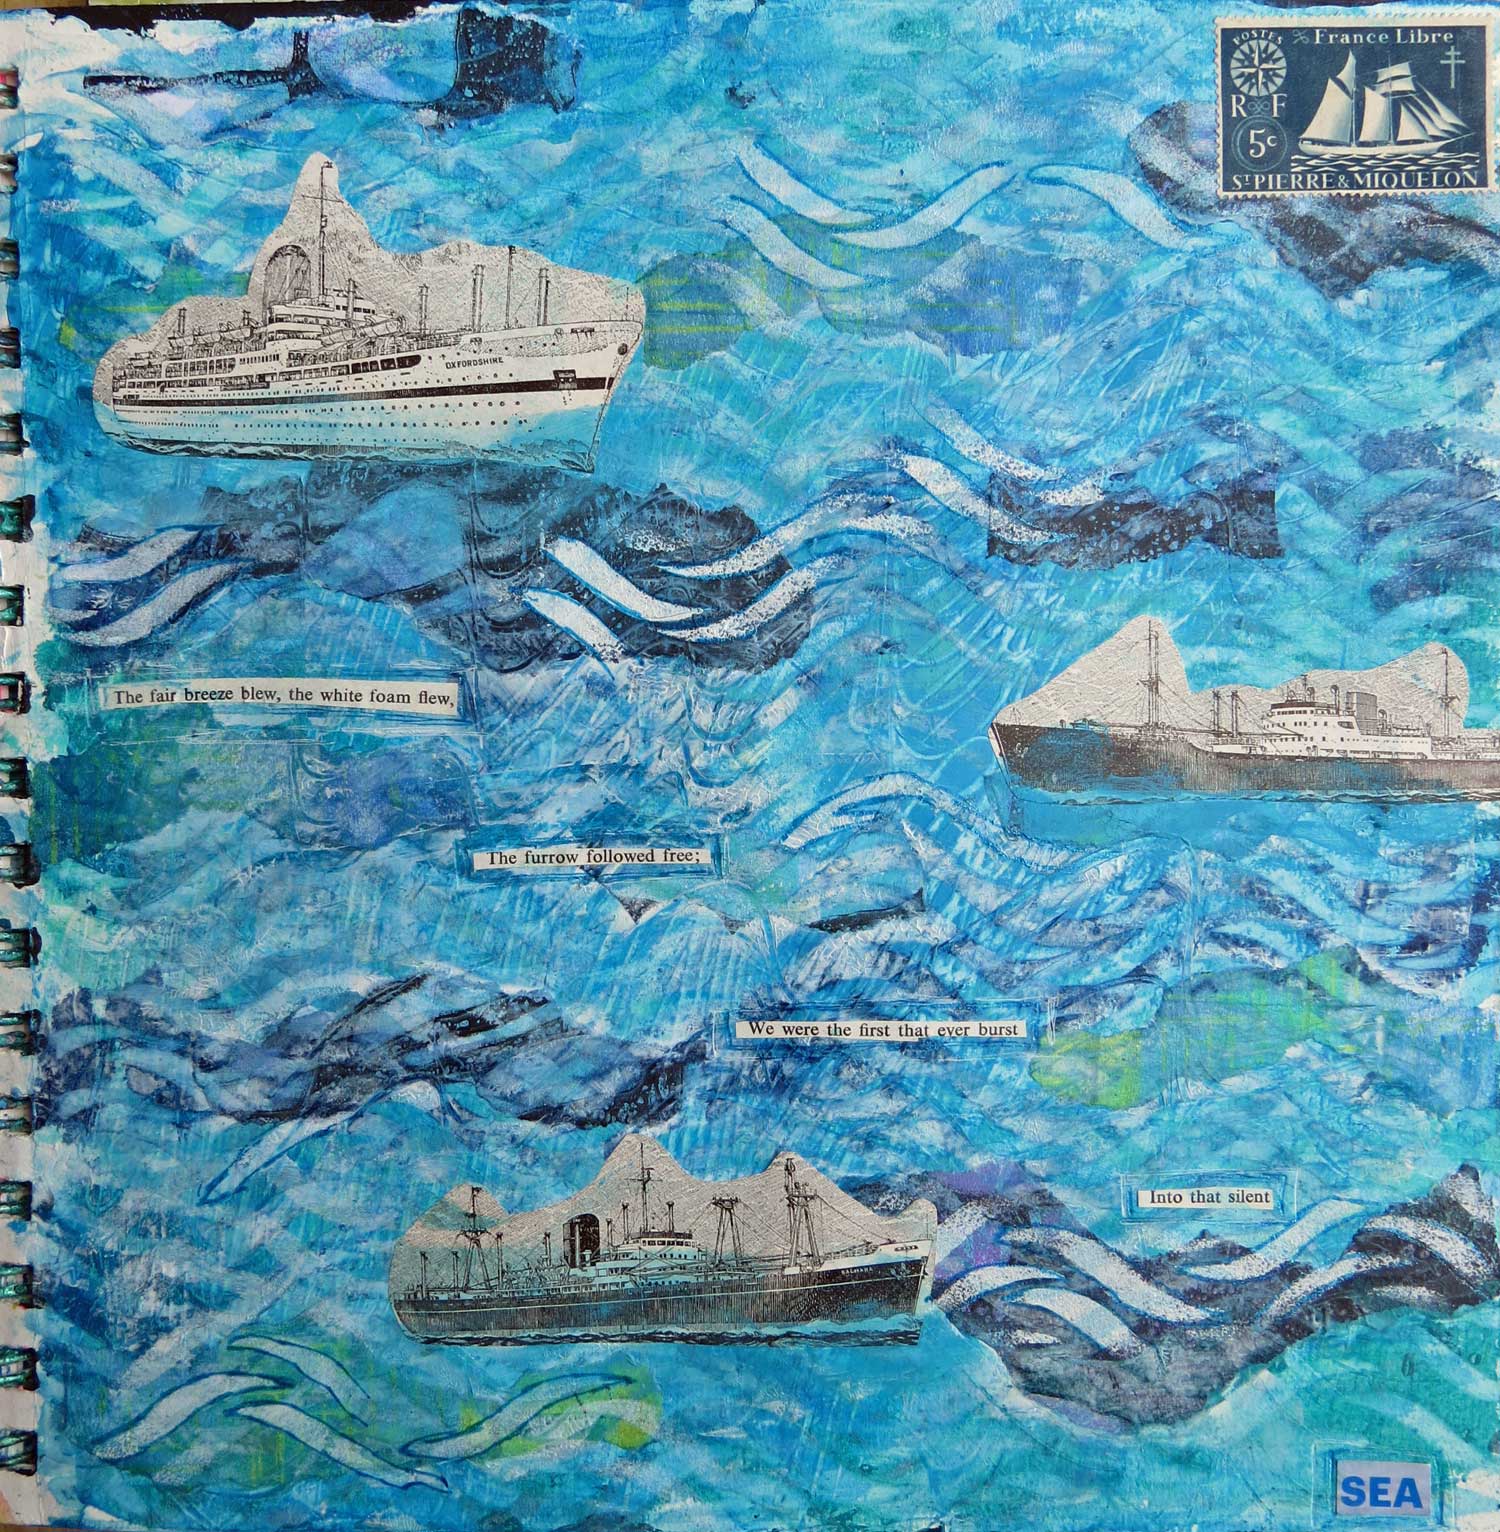
Silent Sea
The letter S is what we were told to use on Joggles Art Journal Adventures this week and as you can see I went with the sea. I had a great quotation by Samuel Taylor Coleridge's The Ancient Mariner that reads: "The fair breeze blew, the white foam flew, the furrow followed free; we were the first that ever burst into that silent sea".
The background was made entirely by using the S480 Symmetrical Waves stencil from Stencilgirl Products, and midway through I added more texture by tearing up strips from previously made gelli plate printed papers and glueing them on. I then added some more stencilling with the same stencil.
The ships came from a vintage book on seamanship and I also found a great postage stamp to add to the page, which is part of the 9 x 9" Bee Paper Mixed Media journal.
Mica spray paint was also added although it is hard to tell. In the background above you can also see the wave marks I made when I gessoed the page at the beginning.
The background was made entirely by using the S480 Symmetrical Waves stencil from Stencilgirl Products, and midway through I added more texture by tearing up strips from previously made gelli plate printed papers and glueing them on. I then added some more stencilling with the same stencil.
The ships came from a vintage book on seamanship and I also found a great postage stamp to add to the page, which is part of the 9 x 9" Bee Paper Mixed Media journal.
Mica spray paint was also added although it is hard to tell. In the background above you can also see the wave marks I made when I gessoed the page at the beginning.
Thursday, 1 February 2018
Art Cards 24 - 27
Here is the next lot of art cards. I'm aiming to catch up with the cards so that I upload one to Instagram every day till the end of the year. Because I made a late start I'm slightly behind. The cards are done to date but uploading them takes a bit longer as I don't want to overload my Instagram feed.
For techniques and materials used check out the labels below. All stencils used are by Stencilgirl Products.
![]() |
| Art Card 24 |
![]() |
| Art Card 25 |
![]() |
| Art Card 26 |
![]() |
| Art Card 27 |
Tuesday, 23 January 2018
Art Card 17
Time for another art card. Something colourful is needed to brighten up this dark and dismal day! It's warming up outside and that has produced some slushy, horribly muddy and wet mess. It's one of those very few days when the dog walk did not beckon. Flora had to be carried over some of the wettest parts as the water would have reached over her head. On the plus side no more deer parts were discovered!
The background of this card was done with the gelli plate and Stencilgirl Products stencils. I added rubberstamping with a stamp from Everything Art and collaged on the Buddhy and the vintage text. This card came together very easily as I so loved the background that not much else was needed.
Monday, 22 January 2018
Art Cards 7 - 16
Behind the scenes I am working away on my #365somethings2018 art card (sized 3 x 3") project. You can find each individual one on my Instagram feed. But I also wanted to share them here so you are getting them in batches whenever I can fit them into a blog post. The idea is to work on the cards every day but not to necessarily finish one every day. Sometimes I work on backgrounds, then on another day rubberstamping is added, then stencilling, collage, ink dripping or whatever else I can think off, till one of the cards looks like it is almost done. Then I concentrate on finishing that particular one. Eventually I still hope to have 365 finished cards at the end of the year. Above No. 7 - 15.
And this is no. 16, the most recently finished one. As you can see it has gelli plate printing, rubber tamping, collage with vintage text as well as washi tape. The face became the last addition to serve as a focal point. It was outlined with water soluble oil pastels.
Thursday, 11 January 2018
Art Card 3
Here is art card 3 of the #365somethings2018. To check out all the techniques I used on it check out the tags underneath this post. The stencils I used are by Stencilgirl Products.
Again the fabric used in the background on the above picture is designed by Alison Glass.
Wednesday, 10 January 2018
Art Card 2 Silence
The second card for my #365somethings2018 project is finished. It was asking out to have the final touches put onto it, so I did. This is how I anticipate things to go this year. I will continue to make backgrounds on these 3 x 3" cards till I have 365 done. Then I will add collage, rubber stamping, stencilling, ink dripping and any other technique I can think up and add them to selected cards till I spot one that is almost done and that one will then get my full attention. 
It is my aim to finish all of them within this year and sometimes you will get batches of them together but at the moment it's one at a time while I continue to work on the rest mainly unseen here unless I particularly like a collection of unfinished ones to photograph on an otherwise uninspiring day for photography.
I'm not going to mention all the supplies I used (mainly because I don't remember them) but the stencil I used on this card is from the November 2017 Club set by Stencilgirl.
Again the card was photographed on a fabric designed by Alison Glass. I have a whole bundle of fat quarters designed by her,ready for my next project and they make for great photographic backgrounds.
Wednesday, 27 December 2017
The Windmills of Your Mind
Just like that I have reached my last appearance as Guest Designer for Stencilgirl Products this year. However I will be back bright and early in January as they have asked me to return
and make a monthly project each month in 2018. Many thanks to them for inviting me and featuring my art. It is an honour as well as a challenge and a pleasure.
As always there is a step by step tutorial on Stencilgirl Talk for these pages which were loosely inspired by Xmas ornaments but also by my enduring love for circles. I surrounded mine with song lyrics but you could also journal about the end of one year and the beginning of another. These are ornaments for your art journal! I used a 8 x 10" gelli plate by GelliArts with the Stencilgirl stencils to make the collage elements that together form the various rings of the circles.
Just a quick thought as I'm writing this. You could easily use the same method to make actual ornaments to hang in the tree. If you start now you will be ready for Xmas next year!! Oh, if only I would take my own advice occasionally.
I was right about the ice situation today. It has been the coldest night so far this winter and in fact our outside thermometer was so frozen that we couldn't read the temperature. It was great that we had cleared paths through the snow yesterday. It made things so much easier today but although we could get out of our drive with the car the lane itself is like a sheet of ice so we will cosy up at home today.
Apart from the dog walks, of course, and what a joy it was to set out this morning with Flora accompanied by sun and snow. I couldn't help myself and just had to take some more pictures. Here they are:
As always there is a step by step tutorial on Stencilgirl Talk for these pages which were loosely inspired by Xmas ornaments but also by my enduring love for circles. I surrounded mine with song lyrics but you could also journal about the end of one year and the beginning of another. These are ornaments for your art journal! I used a 8 x 10" gelli plate by GelliArts with the Stencilgirl stencils to make the collage elements that together form the various rings of the circles.
Just a quick thought as I'm writing this. You could easily use the same method to make actual ornaments to hang in the tree. If you start now you will be ready for Xmas next year!! Oh, if only I would take my own advice occasionally.
I was right about the ice situation today. It has been the coldest night so far this winter and in fact our outside thermometer was so frozen that we couldn't read the temperature. It was great that we had cleared paths through the snow yesterday. It made things so much easier today but although we could get out of our drive with the car the lane itself is like a sheet of ice so we will cosy up at home today.
Apart from the dog walks, of course, and what a joy it was to set out this morning with Flora accompanied by sun and snow. I couldn't help myself and just had to take some more pictures. Here they are:
|
| the tree at the top of the forest |
|
| Notice the Pentland Hills in the distance |
|
| coming out of the forest through the tunnel (drainage ditch) |
Some pictures from this afternoon’s walk;
Friday, 18 August 2017
The Final Artmarks
![]() |
| stitched |
![]() |
| closed |
Subscribe to:
Posts (Atom)