Showing posts with label collages. Show all posts

Thursday, 26 December 2019

Christmas Collage

There are so many delectable Christmas themed magazines around at the moment that I found myself tearing out all kinds of imagery, temporarily forgetting that I had finished my 52 collages already. But as I mentioned there are some empty pages in the Moleskine 5 x 8" journal I was using for the #52collages2019 project and it was fun adding one more. I was particularly happy with the Flora look-alike watch image!

Monday, 18 February 2019

Collage 8

Another week has passed and this is collage 8 in my series of 52 collages in an 5 x 8" Moleskine journal, made as part of my #52collages2019 project.

I never plan these collages out but instead start by making a background. Sometimes this is one image and at other times such as this one the background consists of various different images, all obtained from magazines and the like.

Then I start tearing out a wide variety of imagery that catch my eye as I leaf through magazines. I also find things in newspapers, my stash of vintage postcards and catalogues. The text is usually the last item that gets added.

For this collage I used a vintage postcard featuring a house in Barcelona, a Chinese postage stamp, a detail from Grant Wood's painting American Gothic and washi tape with text. It's hard to say when I stop but the best way to explain it is to say it's done when the entire page looks like it was always meant to be. .

Tuesday, 12 February 2019

Collage 7

This is my latest collage for my #52collage2019 where I am making one collage each week this year in a 5 x 8" Moleskine notebook. I originally started a 30 day collage class with Shelley Klammer and have been re-reading the notes she send me at the time (2015). Among many other things I learned was the idea to look back at the collages you made and think what it could mean. Does it reflect some issues you're dealing with, for instance? Not all collages came with easy answers at the time I made them but looking back I can discern better what had been bothering me at that time. Perhaps it's better to leave them for the moment immediately after they're made and reflect later, perhaps many years later.

In the meantime I'm rediscovering my love for this medium and am enjoying the process. This one, I think, worked out particularly well.

Monday, 28 January 2019

Collage no. 5

Here is collage no. 5 for my #52collages2019. One thing that I'm noticing more and more is that what these weekly, daily or monthly projects tend to do is make it feel that time does indeed fly. This morning for the first time the dog walk took place when the sun was already fully above the horizon and the darkest days are behind us. It helped that it was a cloudless, frosty day but still, it makes such a difference to have the light return.

As I've mentioned on previous posts I'm  making a weekly collage this year in an 5 x 8" Moleskine journal, using just images from a wide variety of magazines and my trusty UHU glue stick. This one is dedicated to the artist Frida Kahlo, not exactly a stranger in my art. I love both her work and the way she lived her life with great courage and perseverance.

Monday, 21 January 2019

Collage no. 4

This is my latest collage for my #52collage2019 project. Somehow we are already in week 4! I'm working in a 5 x 8" Moleskine journal for this project and am using an archival UHU glue stick. You can see the other collages so far by clicking on the 52collages2019 tag below this post or in the sidebar.

Monday, 14 January 2019

Collage no. 3

Here is my collage for week 3 of 2019. I'm hoping to make one a week this year as part of my #52collages2019 project. My imagery will come from a wide variety of magazines and will thus be a good excuse for the occasional indulgence of magazine buying. On this one I also added postage stamps and washi tape.

Tuesday, 8 January 2019

Collage 2 Be Bold


Here is my collage for week 2 of 2019. I'm hoping to make one a week this year as part of my #52collages2019 project. My imagery will come from a wide variety of magazines and will thus be a good excuse for the occasional indulgence of magazine buying. This particular one has elements mainly coming from a Reclaim magazine. In the background is a detail of a Pierre Bonnard painting.

Wednesday, 27 November 2013

Borderline Sketchbook

It remains a mystery to me why a project that was almost completely done in the summer took so long to finish. It was lingering on my desk and my to-do list for months now and the only thing I needed to do was add matte medium to the covers to preserve them. Finally I did the deed yesterday and the sketchbook is now ready to be mailed off to the Brooklyn Art Library and become part of the Sketchbook Project. I have been participating in these yearly sketchbook projects for quite some years now and this is my 6th sketchbook. You can see the previous ones here.
In the previous ones I left the sketchbooks mainly in tact apart from glueing pages together but for this one I wanted to make the entire book itself the art project. I had chosen as my theme Borders and Lines, and after some thinking I cut the pages in various widths going from about 1/2 inch at the beginning of the book to almost the complete page at the end. I left the covers in tact as that's almost mandatory. The size of the original sketchbook is 5 x 7". You can see how it looked at that stage above. I had started by painting what remained of the pages gold and then collaged over them using paper napkins, tissue paper and various texts such as bits of a Spanish newspaper that I picked up somewhere.
I then added different laces in between the pages. The laces were stiffened up first using a thinned down PVA glue to make them stand up and they were space dyed before stiffening. I sewed them in between two pages. Above the first very thin (about 1/2") page. Following are all the pages in the order that they are in the sketchbook itself.
 As you can see I stamped sayings about borders and lines on the edge of the pages.
 I used different lace on each page.


 The above is probably my favourite of this sketchbook. By some flukish coincidence I found an article about Paul Klee in the Spanish newspager! Such great synchronicity once again.


 This is the front cover with collage, glued on lace and the title of the sketchbook stamped on.
On the left hand side is this Sketchbook's barcode in the Brooklyn Art Library that will be scanned every time someone borrows it. This can be done in the library itself but the sketchbook will also go on tour in 2014. The Sketchbook Project has now become so popular that not all the sketchbooks can go on one large tour as happened this year but instead there will be 4 different tours in various areas of the United States. As I won't be there anyway I choose the 2014 South East Tour  for no other reason than that I know at least some people (such as Lenna!) who live there. Every time my sketchbook get borrowed I receive an e-mail. The sketchbook that was on tour this summer was borrowed many times in many different places and it was such a treat to see that people I didn't know and probably will never know were enjoying looking through my book.

This book will be going postal in the next few days and no doubt I will sign up again as soon as it is possible for the 2015 tour!

Tuesday, 28 May 2013

Golden Mask Spread

I'm nearing the end of my Unmasked Sketchbook. Only one more page to finish before I can send the sketchbook back to The Sketchbook Project. It will then become part of the Capes, Masks, and Tights tour in 2014 and travel to Brooklyn, Boulder, Santa Fe and Wickita.
If you're a regular reader you will have realized by now that I'm ignoring the capes and tights and concentrating all my efforts on masks. In this case it's a golden fabric mask that has been added to a collaged background, created by glueing pieces of paper from mail order catalogues and the like to the page using matte medium and colouring the resulting spread using watercolour paints.
I then added stamping, doodling and washi tape for additional interest. As the pages in the sketchbook were not sturdy enough to cope with all these layers I sewed them together to make a thicker surface. This also meant I made less spreads than the original sketchbook had to offer, but I think it makes for a better and more longer lasting sketchbook as a result.

Despite my initial panic when I discovered that I had signed up for this particular themed tour by mistake (and once made you can't change it!) the challenge seems to have spurred me on to make what I think is my best sketchbook to date. If you want to see the other ones, they have all been digitized by the Sketchbook Project and you can find them online here.

Tuesday, 21 May 2013

Masquerade spread

My sketchbook for the Sketchbook Project on the theme of Capes, Masks and Tights is rapidly filling up with spreads. If you're new to this blog ( and if you are, a HUGE welcome!), I'm concentrating on Masks only, forgetting about capes and tights. I'm making my spreads for this sketchbook by collaging small pieces of paper from mainly mail order catalogues onto the pages composing them as I go along, using matte medium. I then add colour on top using watercolour paint. The next step is stamping and doodling, as well as adding text.
You can see the process above and perhaps you recognize one of my favourite collage materials; the wrappings for Amaretto biscuits. I don't personally eat them (never been keen!) so John gets that pleasure but I love the wrappings with their Italian text and also the metal tins they come in, which get used for storage in the studio.
The final touch for these spreads is the addition of the fabric mask, also using matte medium, both to glue it on and to cover it. All these layers are more than the thin pages of the sketchbook that the Sketchbook Project send you to use, can cope with, so I'm sewing two pages together to make them more sturdy. I could have used glue instead but as my sewing machine is always ready to use and I don't like stickiness I usually opt for sewing. You can see the black sewing lines in the top picture.

Once the sketchbook is done I will mail it to the Brooklyn Art Library and from there it will go on tour to various venues in the US next year and eventually it will become part of the library's sketchbook collection. It will also be digitized and have an online presence for all time to come. If you want to see my previous sketchbooks for the Sketchbook Project you can find them on their website here.

Tuesday, 14 May 2013

Up Close Spread

The next spread in my Unmasked sketchbook for the Capes, Masks and Capes Sketchbook Project has been completed and here it is. As the fabric mask I wanted to use looked a bit menacing to me I added a similar looking face on the other side to balance the arrangement. It's made in the usual way by collaging small pieces of paper using matte medium, adding such items as the wrappings of Amaretti biscuits. John is the one who eats them. I just buy them for the lovely tins they come in and the wrappings that add a touch of the exotic to any collage. There is quite a bit of stamping on this spread too, using flower and face stamps. Washi tape is also included.

You can the different elements quite well on the above detail. Only 3 more spreads to go to complete my sketchbook now, so well on the way as the sketchbook doesn't need to be shipped to the Brooklyn Art Library till August. In due course they will digitize it and it will appear with my other sketchbooks I did for the Sketchbook Project here.

Wednesday, 8 May 2013

Hiding spread

Sadly the sun has once again retreated behind dark clouds, the wind is up and it's raining, but the memory of yesterday's beautiful day still lingers. In the studio the next spread in my Capes, Masks and Tights sketchbook has been made, concentrating only on the Masks bit in the title. The spread has been made much like all the previous ones (if you want to see these, press on the unmasked label below this post or in the sidebar). Scraps of paper (mainly from mailorder catalogues but also including the wrappings of Amaretti biscuits) were collaged onto the page and painted over using watercolour paint. Stamping, doodling and outlining were added as shown.
You can see more of the details on these pages. The words are more used as graphic elements than as meaningful phrases.
The last thing I added was the fabric mask which was collage down using matte medium. The stitch lines you see are holding two pages together. I had to double the pages up as the pages in the Sketchbook send to me by the Sketchbook Project were too thin to cope with all that paint and glue. It also meanst I had less spreads to make which enhanced the quality of the individual spreads, I think.

Tuesday, 30 April 2013

Black Mask spread

My latest spread for my Unmasked sketchbook for the Sketchbook Project uses a lot of orange which is rather appropriate for today when a new king will be crowned in The Netherlands. He is the latest member of the House of Orange to reign over the country where I was born. Amazingly I left back when Queen Juliana was still on the throne, which makes me feel ancient. He is also the first man to rule the place after 3 queens and one queen/regent.

The sketchbook is one of a line of them done for the Sketchbook Project (you can see the previous ones here), and is dedicated to Masks although made for the Capes, Masks and Tights theme. It's made by collaging the pages with snippets of paper from a variety of sources and using matte medium to hold it all down before adding watercolour paints, washi tape, and stamping, until I was happy with how the pages looked.
 Here is my favourite bit from this spread. I just like how that dreamlike face comes up from the depths.
The final touch is the addition of the black fabric mask, also adhered with matte medium. Because of the layers of paper and paint the pages of the sketchbook weren't really sturdy enough to cope so I sewed some of them together to provide a more solid background and it also meant I didn't have to worry about the paints leaking through to the back. You can see the sewing line clearly above. I could just as easily have glued them together but I prefer to use my sewing machine. That way I know they won't come apart!

I have the feeling that I'm going to find it rather more difficult than in previous years to part with this sketchbook but it will be in the collection of the Brooklyn Art Library for all time to come as well as being present online in digitized form.

Wednesday, 24 April 2013

Hiding Behind A Mask spread

My Unmasked Sketchbook is talking shape nicely and this is another spread I made for it. You will see the link for this project in the sidebar too. It's part of the Capes, Masks and Tights 2014 tour of the Sketchbook Project which will take in Brooklyn, Boulder, Santa Fe and Wichita. I'm ignoring the Capes and Tights, and concentrating all my efforts of the Masks. If you want to see my previous spreads in this sketchbook as well as previous ones I made for the Sketchbook Project you can click on the Sketchbook Project tag below this post or in the sidebar. Eventually this sketchbook like the previous ones will also be digitized and you can find that on the Sketchbook site here.
 All my spreads are made by collaging small scraps of paper onto the pages, mainly coming from mail order catalogues, using matte medium, then adding colour using watercolour paint with the additions of Faber Castell Gelatos (love them!) as well as stamping and doodling.  The mask is fabric and has also been adhered with matt medium. All this collaging makes the pages of the sketchbook much thicker and I have therefore only used half the pages in the sketchbook and sewed those pages together with the remaining empty pages to give them more sturdiness as well as reducing the thickness of the sketchbook which is not to be more than 1" thick.You can see that stitching along 3 sides of the pages in the top picture.
I love all the additional texture of the collaging and the "happy accidents" that occur when glueing in the initial paper scraps, as happened for instance in the presence of that little face you can see bottom left in the above picture. No idea it had landed there till the page was done!

Further good news came my way as my 52 Journals made last year (one journal quilt for every week of 2012) will be exhibited at the Loch Lomond Quilt Show on from 15th - 18th May coming up. I'll try and be there myself too for some if not most of the time so if you're going, come and say hello. I'm in the Riverside Parish Church together with Ineke Berlijn and Gillian Cooper. It should be fun! More nearer the time.

Tuesday, 9 April 2013

Red Mask

I had an easy day today, after all activities over the weekend and giving a talk last night to the Edinburgh Quilters. I'm always taken aback by just how busy it is in the big city even late at night. Here in the country side all is dark at around 7pm and nothing much happens after that. Only very rarely do we hear any cars. But Edinburgh was just as full of people and traffic when I drove back again as when I came in.

I was going to have a day off but somehow got involved in another journal quilt and was machine stitching frantically most of the day. Still far from finished though.

For my picture today I thought I would show you the first page in my Sketchbook Project for 2014. I've done 4 previous sketchbooks all now in the possession of the Brooklyn Art Library and if you're interested you can find them digitally online here. The 2013 sketchbook is currently on tour with the Sketchbook Project in the States.

I registered for 2014 in a fit of optimism as soon as sign-ups opened and in my enthousiasm didn't exactly read the instructions exactly. As soon as I read masks I was sold (thinking Venice!) but if I had paid slightly more attention I would have discovered that it stated: "Capes, Masks, and Tights tour, looking for extraordinary stories in comic or graphic novel format".  Hum, that's so not me! But on the plus side when the sketchbook arrived it also said not to be inhibited too much by your chosen theme. Okay! I have probably strayed off the path a little more than they would like but it must be said I had a great time doing so.

My sketchbook is forgetting all bout the Capes and Tights bits and concentrates completely on Masks. It's also most definitely not comic but I did try and do edgy.

I choose a collage technique where I used matte medium to glue in torn bits of paper, coming mainly from mail order catalogues that arrive unasked for on an almost daily basis. I made sure to include a face. Once this was dry I added colour with watercolour paint, added stamping and doodling, as well as washi tape. Once I was happy with the overall effect I added the mask. This is fabric and again was glued down with matte medium. All this heavy collage action is a bit much for the rather flimsy pages of the sketchbook (sized 5x7") so I adhered pages together to make them more sturdy. I did this by stitching which you can see around the sides.

You will be seeing all the pages in the sketchbook over the coming weeks. If you want to keep an eye on them they will all have the label Sketchbook Project underneath each post and you can also see in at the bottom of the sidebar. Clicking there will bring up all the pages of this one eventually as well as all my previous sketchbooks.

Thursday, 24 November 2011

Gauche Alchemy 3

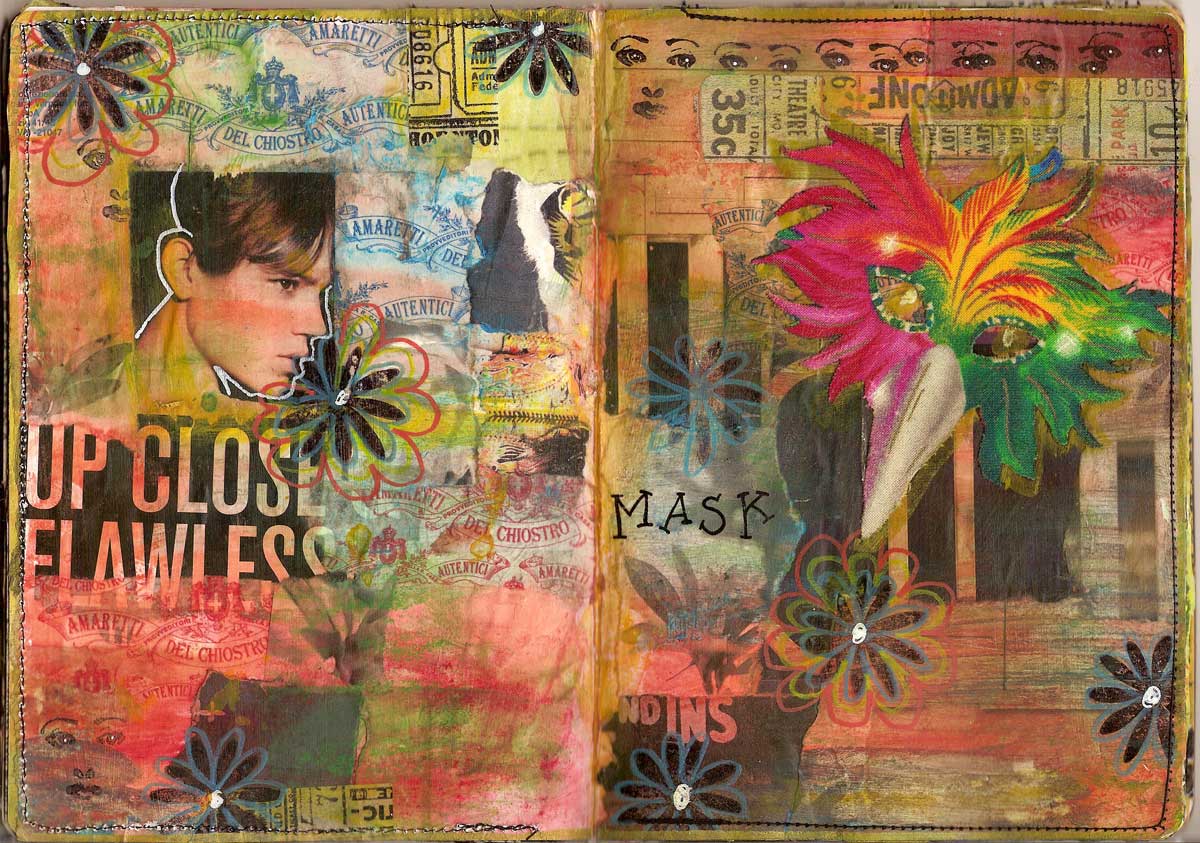
Here are the last 2 projects I made in my capacity as Guest Designer for Gauche Alchemy. Both could be individual collages but I made them to also fit into the book (in the Bare Nekkid kit I worked with and which you can obtain here) and the cover for which you can see in my previous Gauche Alchemy post a week ago. You can also see these two pages on the current Gauche Alchemy site. Full instructions for making these pages beneath:


Eye Page
5 x 7”


Start with a piece of corrugated cardstock (kit) and cut to size 5 x 7”
Rub the surface with both a gold and a sepia inkpad.
Stitch a length of the lace (kit) along the bottom edge.
Tear a piece of text paper (kit), rub the edges with a sepia stamp pad. Tear a slightly smaller piece of craft cork (kit), stamp with a text stamp (I used KK2622 Life connects… from Hampton Art Stamps), and age the edges as above.
Tear an even smaller piece of brown paper (I used the wrapping paper the kit came in), stamp on the eye (The All Seeing Eye from Uptown Design) and age the edges as above.
Layer up all these pieces as shown on top of the corrugate card and stitch together by machine using a decorative thread. Sew slowly! There are a lot of layers but your machine should manage fine.
If you prefer, you could also glue all these layers together, one at a time.
Stamp a small tag (kit) with the text from Life Consists… stamp (see above) and adhere as shown with a brad (kit).
Stick on the self-adhesive EYE letters (Real Life Antique Letters).
Adhere the black vintage brooch as shown through the corrugated ribbles of the card stock. I found this in a second-hand shop so you probably won’t find something identical but search through your own vintage treasures and I’m sure you’ll find something equally suitable!)


Love page
5 x 7”

Make a small quiltie (size 5 x 7”) by layering up a piece of vintage napkin (with fringe attached to one of the short sides) and batting. Machine quilt the layers together using your preferred method. Zigzag stitch the long sides closed.
Transfer an image from a cabinet card to cotton, using a fabric sheet and following the manufacturers’ instructions. Layer with a piece of sepia coloured transparent fabric and stitch onto your background as shown. Sew on a strip of lace and the brown wire ribbon (kit) to the left of this image.
Machine stitch 3 lines to the bottom with metallic thread.
Add embellishment as follows:
Sew on 3 buttons (kit) on top of the brown wire ribbon
Sew size 11 seed beads around the edge of the image
Glue on 4 photo corners (kit)
Sew on 5 vintage buttons to the bottom of the piece as shown
Glue on the self-adhesive LOVE letters (kit)

Tuesday, 4 October 2011

More painted pages

As I mentioned in an earlier blogpost I'm slowly making the necessary ingredients for the collages I hope to make for the 14th Collage Exchange next year. I needed more papers so duely set to and painted some more today and again used the wonderful cotton reel which produces two circles in one go. Circles are my favourite shape in all the world and by making more papers using it I know they will all go together well, which is good n ews for the resulting collages. The next thing I need to do is start on fabric to accompany the papers. The above one is also my blip for today and here are two more.


Some of the pages I made today reminded me of the beautiful photographs shown on the news yesterday, made by the ALMA telescope in Chile showing the beginning of the universe. Very hard to get your head around the fact that we can now see this happening many million years later but also awe inspiring and breathtaking! One day we might be able to see the very start of, well, of what exactly, the beginning of the very beginning?! Was there anything prior to that? It truely is almost impossible to graps all the implications.


This last page is very dark although I brightened it up a bit with gold acrylic. It looks very leathery (which could be a good thing!) as I kept on going on it for that little bit too long. I should have stopped when the going was good. I might add wax to it at a later stage to reinforce that leather look before I start using it in collages.

Saturday, 17 September 2011

Painted Paper


It sometimes seems to me that I make art in reverse. I started by dying and then painting on fabric, because that's the medium I use mostly for my artwork, but as I'm getting more and more interested in collage I have taken the revolutionary step of also painting on paper! This is where most artists start. As I have a huge collection of fabric paints this is what I mostly use on paper too (there really is no reason why not) but I do augment that with acrylic paint, specially the Golden liquid acrylics. I also love the Mica sprays, which give the work a great sheen, although sadly you loose much of that on the scan or photograph.


I'm probably going to make collages for the 14th Collage Exchange and have started to paint a large collection of watercolour paper to use in my pieces. I didn't paint all these pages today (in fact I didn't paint any pages today) but over the past month or so. They were left to dry in my painting studio ( that's my half of John's shed!) and I collected and ironed them flat this afternoon.


The one above is my favourite to date and that one might well stay in one piece for the moment as a little treasure to be saved for that extra special occasion. Actually that means I'll rediscover it some time in the future in a file folder! But to get over that precious feeling I'm now photographing or scanning such pages so that I can use the resulting digital files to print it out again on any medium I fancy, either fabric, paper or a transparency.


Here are some more:

The circular pattern on this sheet comes from a cone of sewing thread. I was about to throw it in the bin when I spotted it's potential on the bottom. It makes the two lines at the same time. The centre gold dot comes from the end of a pencil.


The numbers you can just about see are from an commercial mask but the large dots come from sequin waste (also known as punchinella) and the smaller dotty pattern from a strip of paper I punched with edge design punches.


This one uses a commercial mask to make the pattern seen on the right but I also used some ribbled packing paper to make the stripy texture you can see middle bottom. I love using things I find in the house as well as " official" art supplies. It somehow makes the work more your own.


I'm an extremely messy worker (which will be no surprise to those of you who know me!) but I do my level best not to dirty up my actual art work and to that purpose I use baby wipes (love the Huggies ones specially). I use them to wipe my hands occasionally (yes, I know I should wear gloves but I simply can't), clean my rubberstamps, wipe off any masks I've used, etc. You name it, I will probably do it with a baby wipe. And sometimes those baby wipes become unintentionally wonderful colour surprises. They do have that pattern already on them (different ones for different brands) but for me that just adds to the attraction. They are also 2-ply so by separating them you get 2 for the price of one! Always a good thing.


This last one is also a baby wipe that was used as a wipe cloth and it has become my favourite one so far. Simply letting it develop by wiping your hands, brush, rubbing over your paper and cleaning your stamps can produce the most beautiful end result. By photographing it I know I can use it again even if I cut the original into pieces to collage with.

LinkWithin

Related Posts with Thumbnails